Tailscale lets you share things with your coworkers, your family, and your friends; but not everyone else. This allows you to set up your own private URL shortener or expose a test instance of your application to your coworkers, but sometimes you need to test your tools against the real world. Tailscale Funnel allows you to expose your local services to the public Internet, just like any other website.
Today I'm going to walk you through the basics of funnel and show you how to use it with a live demo. We're going to start by creating a small service that says hello world, and then I'm going to show you how to make it interact with other applications on the internet, such as receiving webhooks from Tailscale.
In order to follow along, you will need the following:
- Tailscale 1.38.3 or later with Funnel enabled
- A development machine running Linux, macOS, or Windows.
- Deno installed on your development machine.
Be sure funnel is enabled in your tailnet policy file for your development machine. Funnel won't work without it.
Making the service
First, we need to generate the service scaffold for the application we're going to make. You can use any tool you like, but for simplicity I'm going to be using Deno and Fresh. To get started, open a terminal on your developer machine, and run this command:
deno run -A -r https://fresh.deno.dev funnel-example
It will ask you a few questions, answer them based on your preferences. You can replace funnel-example with a different name if desired.
Enter that directory with cd:
cd funnel-example
Then run deno task start to start your web service in developer mode:
deno task start
Open the site in your browser. By default, this will run the service so that you can access it from your tailnet.
Now that the app is running, use tailscale serve to route to that port:
tailscale serve https / http://localhost:8000
Then you can confirm it with tailscale serve status:
$ tailscale serve statushttps://xe-dev-vm.shark-harmonic.ts.net (tailnet only)|-- / proxy http://127.0.0.1:8000
Finally, enable funnel for the machine with tailscale serve:
tailscale funnel 443 on
Then confirm it got enabled with tailscale funnel status:
$ tailscale funnel statushttps://xe-dev-vm.shark-harmonic.ts.net (Funnel on)|-- / proxy http://127.0.0.1:8000
Then take that link and link it to your friends! They'll be able to see the changes that you make to your project as soon as you hit save. For example, open routes/index.tsx in your favorite text editor and change it to look like this:
import { Head } from '$fresh/runtime.ts';import Counter from '../islands/Counter.tsx';export default function Home() { return ( <> <Head> <title>Fresh App</title> </Head> <div class="mx-auto max-w-screen-md p-4"> <p class="my-6"> Hey from Funnel! This is running on a machine behind a firewall but you can still reach it from the Internet thanks to Funnel! </p> <Counter start={3} /> </div> </> );}
You can do anything you can with Fresh at this point. Take a look at the Fresh documentation for more ideas. You can also change this to point at another service, such as a Rails app or anything else that listens for HTTP on a network port.
This isn't just limited to webapps, you can also set up GitHub, Tailscale, or other webhooks with this too.
Listening for Tailscale webhooks
To wrap this up, I'm going to show you how to use this in the real world by turning your new application into a Tailscale webhook listener. you can use this to have custom logic run whenever something changes on your tailnet.
First, open the webhooks page in the admin panel.
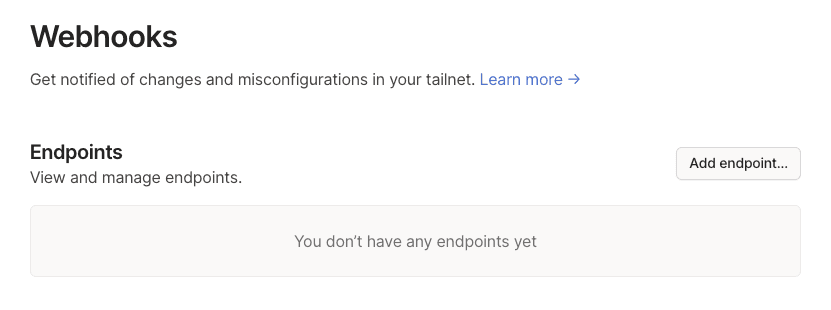
Click on "Add endpoint...".
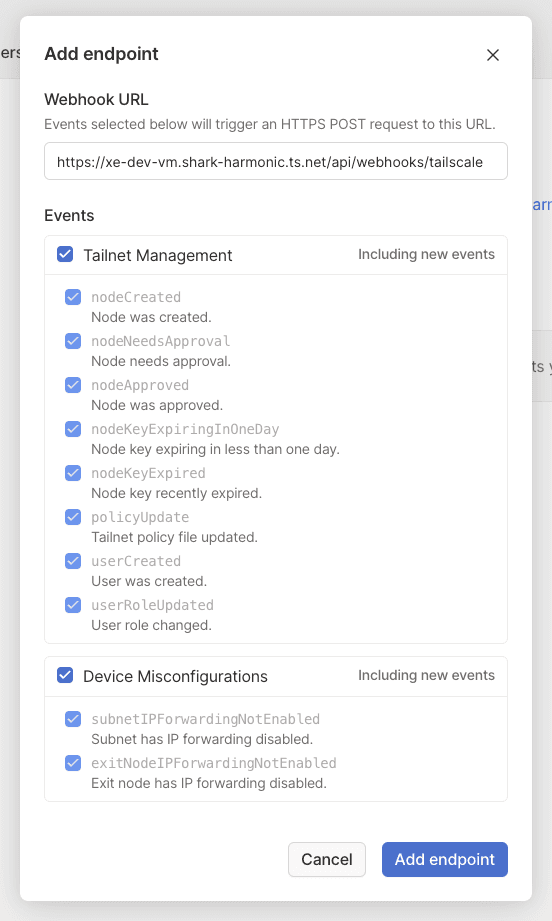
Copy your funnel URL into the Webhook URL box and add /api/webhooks/tailscale to the end of it. Enable all events.
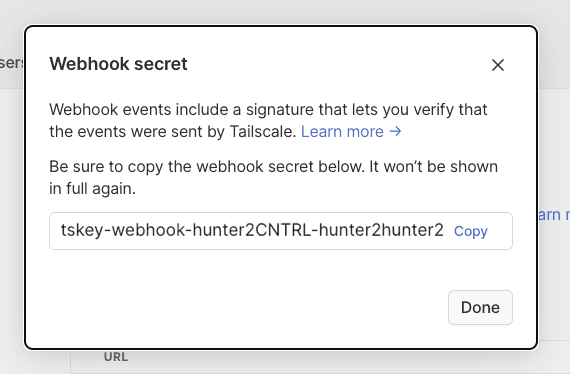
This will give you a webhook secret. Copy this to your clipboard or a scratch buffer/notepad window. Depending on how your organization works, you may want to copy this value into a password manager.
Go back to your IDE and create a new file called .env. Copy the webhook secret into it like this (replace tskey-webhook-hunter2CNTRL-hunter2hunter2 with your actual secret):
TAILSCALE_WEBHOOK_SECRET=tskey-webhook-hunter2CNTRL-hunter2hunter2
Next, load this .env file with the Deno standard library. Open import_map.json and add this line to the end of it:
{ // the rest of the file... "twind/": "https://esm.sh/twind@0.16.17/", "std/": "https://deno.land/std@0.178.0/"}
Then open main.ts and add this line after manifest is imported:
import 'std/dotenv/load.ts';
This will use the dotenv module to read the .env file and load all values into it in the environment.
Finally, we need to add the Tailscale webhook library to the import map. You can do that by adding this to the end of your import map JSON file:
{ // the rest of the file "std/": "https://deno.land/std@0.178.0/", "$tswebhook": "https://cdn.jsdelivr.net/gh/tailscale-dev/tailscale-deno@0.0.1/webhook/mod.ts"}
Next, create a new file in your routes folder: routes/api/webhooks/tailscale.ts. You may have to create a folder called webhooks. Copy the following into that file:
import { Payload, validate } from '$tswebhook';import { HandlerContext, Handlers } from '$fresh/server.ts';export const handler: Handlers = { async POST(req: Request, _ctx: HandlerContext) { const { ok, body } = await validate(req, Deno.env.get('TAILSCALE_WEBHOOK_SECRET') as string); if (!ok) { console.log(`remote client sent invalid request`); return new Response('invalid request', { status: 400 }); } const msgs: Payload[] = JSON.parse(body); msgs.forEach((msg) => { console.log(`[tailscale-webhook] ${msg.message}`); }); return new Response('OK', { status: 200 }); },};
This does the following:
- Creates an async handler for the
POSTmethod. - Uses the
$tswebhooklibrary to validate incoming webhook requests, and if they are invalid then it responds with HTTP status code 400 (Bad Request). - Parses the webhook payload to the variable
msgs. - Loops over all of the messages and runs custom logic (such as printing data to standard out) on each message.
- Responds with HTTP status 200 (OK) so that Tailscale's webhook sender doesn't try to resend the webhooks.
You could easily extend this to do whatever you want from here. If you need some ideas on what you can do with this, here are couple that I find interesting:
- Send webhook messages to other services like Slack or Discord to inform people about tailnet changes.
- Store these events in a database like SQLite and show information in a custom UI.
We've been working a lot on funnel and different ways that you could use it inside your production and personal environments. What other fun uses have you found for funnel? I use it to expose the development version of my website to people that are reviewing its articles for grammatical and technical correctness. Let us know on the Fediverse by mentioning @tailscale@hachyderm.io with the hashtag #funnelHack!