If you came here because of the clickbait title: I got Tailscale running on my robot vacuum cleaner. Get it? Because vacuum cleaners suck. Sorry, it was too good to pass up. But read on for the full story!
So, we have cats. They're excellent cats, but they also shed a lot of hair, which requires more frequent vacuuming. This was my excuse for buying a robot vacuum cleaner, but really it's just neat technology and I wanted to play with one.

My cats, Babou and Cheddar. They are not impressed that you disturbed their nap.
I haven't paid attention to the robot vacuum cleaner space since the original Roombas from the mid-2000s. They've come a long way since then! The entry level ones still follow the classic strategy of taking a random drive through your space, turning whenever they bump into things, and hope that after enough random wandering the entire floor will have been covered. But if you step up a little to the mid- and high-end of the market, the robots come absolutely packed with sensors and smarts!
The robot I got, a Dreametech Z10 Pro, is fairly typical of this mid-range offering. It has a lidar sensor tower, which it uses to construct a map of your home and navigate intelligently around it (no more random walks!). It has front and side-facing lasers, sonars and cameras to avoid obstacles and get close to things without touching them. And all that is powered by a quad-core Cortex A-53 SoC that was specifically designed with vacuum cleaners in mind. That's right, robot vacuums are big enough business that SoC manufacturers are designing chips tailored for them!
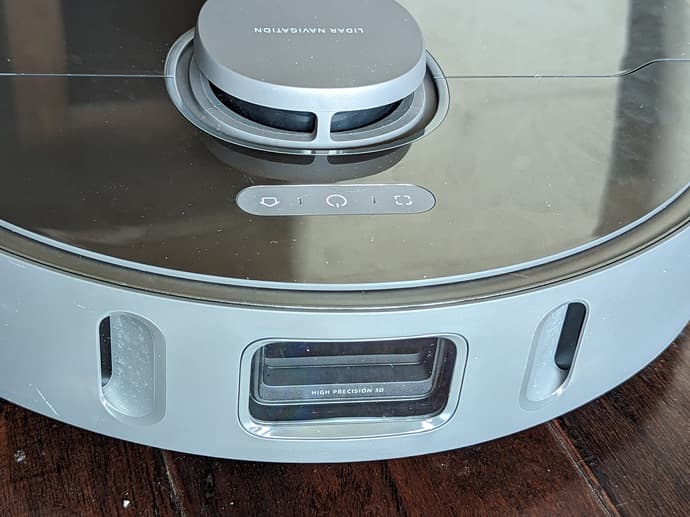
The lidar and front sensor cluster on the Z10 Pro. The robot shoots lasers out of the angled apertures, and an IR camera cluster in the center uses distortion in the beam to sense obstacles.
However, the modern crop of robot vacuums are also firmly IoT cloud devices. They connect to a faraway control plane, you get a mobile app (with a ton of lag, since every button press is bouncing through the cloud and back to the bot), and the machine is a completely opaque appliance. You bought it, but as far as the robot is concerned, you're just a guest in its brain, invited there by its makers.
The Z10 Pro is part of the Xiaomi Smart Home ecosystem, one of the world's largest IoT clouds. Unfortunately, this ecosystem's empirical security and privacy posture is not something I'm comfortable having in my home: as illustrated in a DEFCON talk a few years ago, the manufacturers have effectively unlimited control over their robots in the field, up to and including spawning a remote shell and uploading raw sensor imagery. Clouds don't have to be this invasive, but that's the reality for this robot.
And really, for this application, the cloud is just getting in the way. I wish I could just control the robot directly somehow. And guess what, there is a way! Let's jailbreak my vacuum cleaner.
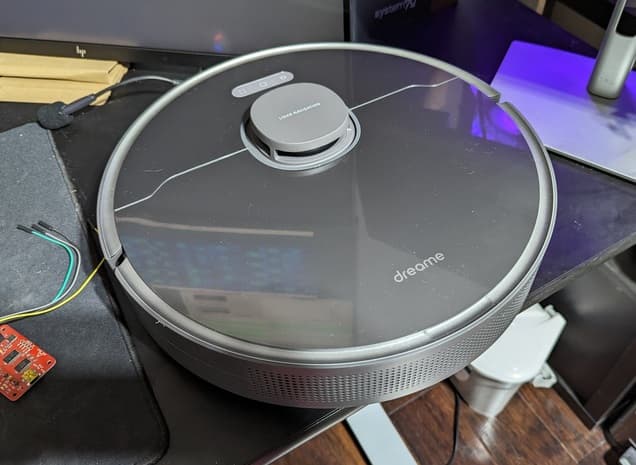
Before we continue, I want to give credit and praise to Dennis Giese and Sören Beye for making all this possible. Dennis has been researching the security of IoT systems for years, and has compiled an encyclopedia of methods and expertise on gaining access to these appliances. Sören built on top of this work and created Valetudo. Valetudo is an open-source control plane for vacuum robots that runs on the robot itself and enables cloud-free operation, as well as integration into open-source automation ecosystems like Home Assistant.
Jailbreaking a vacuum cleaner
I'm going to repeat the words of warning on Valetudo's website: jailbreaking your vacuum can be fun and isn't too difficult, but you need to take your time, read and follow the instructions carefully, and accept that you could brick your robot. This is necessarily somewhat of a messy process, so please be aware of the risks, take your time, read the documentation, and don't take it out on the open-source maintainers (or me) if it goes wrong.
The exact process for getting a shell on a robot vacuum varies between manufacturers and models, and also over time because manufacturers tend to patch the entrypoints as they become aware of them. In my case, the Z10 Pro is on Valetudo's "recommended" list, because (at time of writing) the procedure is quite straightforward and reliable. Let's go!
First, we need to get access to the robot's debugging port. Dreametech have a handy connector on all their robots that collects all the system's debugging busses and pins in one place. We're looking for the system's serial port.
The debug connector is located under a decorative panel on the top. Normally, you would use plastic spudgers and wedges like the ones in an iFixit kit (#NotSponsored, I just like it) to gently apply leverage and pop the clips holding that panel in place. However, I've just moved and I don't know where my iFixit kit is, so instead I did it the wrong way.
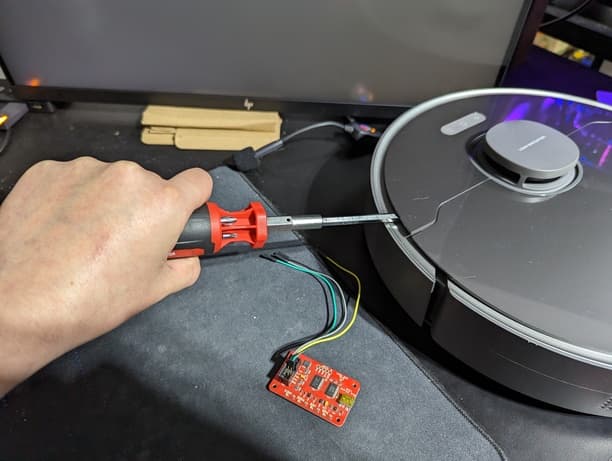
This works, but try to avoid it, the metal screwdriver chews up the plastic as you pry.
It took a worrying amount of force to get the panel clips to pop off, but eventually they come free, and we're greeted with... mostly more plastic as we've uncovered the robot's inner frame, but peeking through a hole in that frame is a small 2x8 connector. That's our debug port!
Oh by the way, you probably want the vacuum powered off for all this.
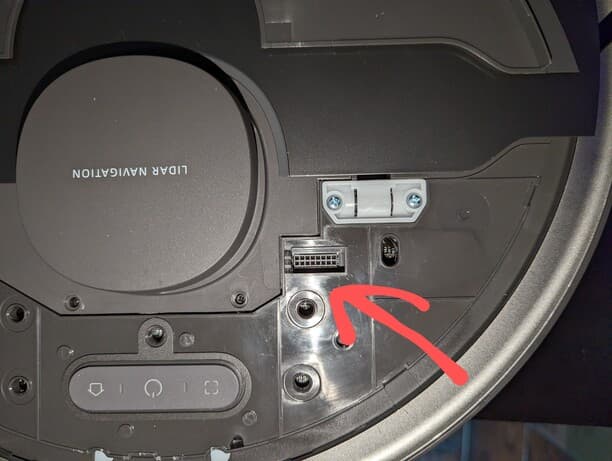
I love hidden ports, it's like that feeling when you mashed the spacebar against walls in Doom and found a secret!
Anyway, now that we have access to the debug port, we need to hook into the robot's serial console. I won't try to explain which pins of the connector you should hook up to, Valetudo's installation guide has a great illustration for that, as well as additional wisdom and warnings. Connecting things incorrectly on this debug port is one of the easy ways to fry your bot, so take care.
Speaking of connecting thing, we're going to need a serial interface so that our computer can talk to the robot. I used a Bus Pirate, an excellent open-source communication multitool that can do (among other things) 3.3V UART, which is what we need. I connected the bus pirate to my computer, configured it as a transparent UART bridge, and hooked it up to the robot's serial pins.
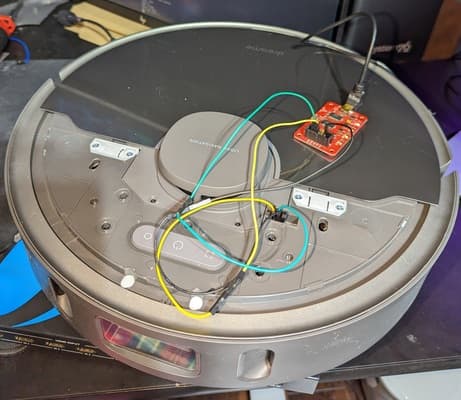
The debug port has a 2mm pitch, and my hookup wire has 2.54mm connectors, so it takes a little violence to make it fit. I recommend being less bad at this than me.
Finally, I powered on the robot, and... Success! The serial console lights up with kernel logs as the SoC boots up. With a little more fiddling which I'll gloss over (see Valetudo's docs), I have a root shell on the robot's OS, which as it turns out is an OpenWRT fork.
From here, it's a simple matter of backing up irreplaceable files (private keys, device IDs, sensor calibration data from the factory), and installing a patched firmware that breaks the cloud connection. A little NAND flashing and rebooting later, and my robot is now a standalone system, with an SSH server, and Valetudo providing a replacement for the vendor app's functionality!
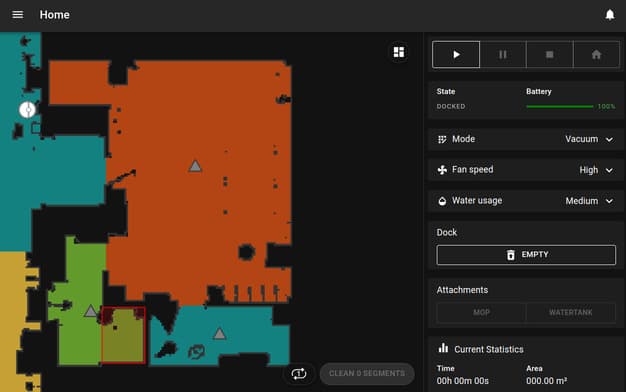
Valetudo is so much more responsive than the manufacturer's app, it's not even funny. Turns out, computers are fast when you don't send every request via the cloud!
At this point, my robot can do everything that it could do on stock firmware, with no cloud tethering. Well... Almost everything. Valetudo is serving its control API and web UI over HTTP on my LAN, which is fine, but I'd prefer to have some form of secure access. For all its downsides, the cloud connection did provide that, whereas now we're stuck with HTTP over local network. Or are we?
Getting Tailscale on the robot
Having done all this legwork, the robot is now a stripped down linux computer that I control. That means I should be able to get Tailscale running on it, and give myself a secure way to access Valetudo, and for Valetudo to dial out to my home automation stack.
SSHing into the robot, we find a barebones linux OS, consisting mostly of busybox and a few addon binaries. Most of the filesystem is a read-only SquashFS, but we can write to /tmp which is discarded on reboot, or /data which is persisted across reboots and firmware updates. One wrinkle is that the firmware doesn't ship iptables (and the kernel doesn't have nftables compiled in), so we'll have to run tailscale in userspace networking mode. That's probably for the best anyway, as I feel more comfortable leaving the OS network stack and DNS config alone on such an esoteric platform.
The robot has a generous 240MiB free space in /data, so we can be a bit lazy and just grab static arm64 Tailscale binaries from the package server and use those. They are not optimized for size, so we'll end up eating about 40MiB of the free space. If you want to be more economical, you can build a stripped down multicall binary from Tailscale's source code repo, by running:
GOOS=linux GOARCH=arm64 ./build_dist.sh \ --extra-small --box \ tailscale.com/cmd/tailscaled
The resulting binary is both the tailscale daemon and CLI. To access the latter, create a symlink called tailscale that points to the tailscaled binary. This approximately halves the storage required, at 19.6MiB.
If you downloaded the tarball straight to the robot, things are easy, just unpack it (I suggest using /tmp as a staging area) and move tailscale and tailscaled to /data. If you built your own, you might encounter a problem when you try to scp the binaries to the robot:
$ scp tailscaled root@192.168.1.100:sh: /usr/libexec/sftp-server: not foundscp: Connection closed
Whoops. The robot's firmware doesn't ship the SFTP server helper binary, and my desktop's modern SSH client no longer supports the legacy SCP wire protocol. So, I can't scp or sftp binaries over. Thankfully, we can do something gross instead:
cat tailscaled | ssh root@192.168.1.100 'cat >/tmp/tailscaled'
This won't preserve file modes, so you'll have to ssh in and chmod +x /tmp/tailscaled, but other than that this works fine.
Now that we have /data/tailscaled and /data/tailscale in place, let's get tailscaled running on boot. You can do this by editing /data/_root_postboot.sh, and adding the following at the bottom:
if [[ -f /data/tailscaled ]]; then mkdir -p /data/tailscale-state /tmp/tailscale STATE_DIRECTORY=/tmp/tailscale /data/tailscaled \ --tun=userspace-networking \ --socket=/tmp/tailscale/tailscaled.sock \ --statedir=/data/tailscale-state > /dev/null 2>&1 &fi
This will start tailscaled on boot, and place its persistent data (private keys, network maps, etc.) in /data/tailscale-state. Non-persistent data such as log files and unix sockets go into /tmp/tailscale, to minimize the amount of writing to flash.
At this point, you can type reboot and see if the robot comes back online. Note that it occasionally likes to change IP addresses if you're using DHCP and haven't assigned it a static IP, in which case you can use mdns to find it again (see avahi-browse on linux). Or, as a last resort, reconnect the serial console and use the root shell there to figure it out. I definitely didn't have to do that after losing the robot on reboot and panicking that I'd bricked it, no siree.
Now that tailscaled's running on boot, we can authenticate it as usual, or mostly as usual:
/data/tailscale --socket=/tmp/tailscale/tailscaled.sock \ up --ssh --hostname=ton618
You probably want to set a hostname, otherwise you'll get the OS's default p2028-release. And it's a good idea to enable Tailscale SSH, because remember the problems I had with scp/sftp earlier? Well, Tailscale SSH embeds its own SFTP server in tailscaled, so by using it I can copy files again!
Run through the authentication dance as usual, perhaps throw in a tag or two from the admin panel so that you can control the robot's network permissions more finely, and voila, one robot running Tailscale!
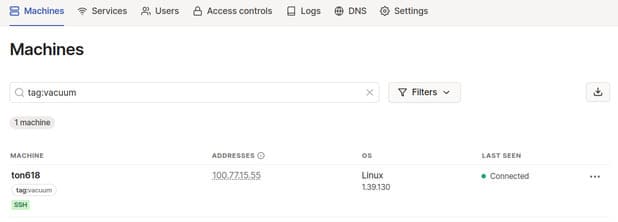
Now you can SSH into your robot vacuum cleaner from anywhere! The future is weird.
Locking down Valetudo
We're almost there, but recall that originally my goal was to limit access to the Valetudo API and webapp. I don't want random stuff on my LAN (say, other IoT devices I don't entirely trust) to be able to poke at my vacuum cleaner. I want Valetudo to only be accessible over Tailscale, although I'll leave the native SSH server accessible to the LAN.
On a normal linux system, I'd just use iptables to firewall off port 80, and be happy. But earlier, I discovered that iptables isn't present on the system. I tried for a while to make it work with a static iptables binary, but iptables refused to function because /run didn't exist, and I can't create /run because / is a squashfs, and even if I could I don't even know if netfilter is compiled into the kernel.
So, instead, let's take advantage of the fact that Valetudo is open-source! It's a nodejs application, and it already includes some IP allowlisting code to only allow access to LAN IPs. This is intended as a protection against people accidentally (or deliberately!) exposing their robot to the public internet.
With Tailscale running in userspace mode, incoming connections to port 80 are proxied by tailscaled to port 80 on localhost. So, all I need to do is go into Valetudo's source code, edit the IP check to only permit localhost, and rebuild and deploy my modified binary.
At some point I would like to try and upstream this change to Valetudo, but obviously it's not suitable for upstreaming in its current form. Perhaps a configurable IP allowlist makes sense? It's not clear to me if it's worth complicating Valetudo's UX for this, when it's quite simple for people who care to deploy a patched instance themselves. Valetudo's documentation is very good, with zero nodejs experience it took me less than 30 minutes to make the change and build my patched copy. If you'd like to do the same, here's the patch to lock down access to localhost only.
Plaintext HTTP over Tailscale is perfectly secure, since the traffic runs over WireGuard, but if you want to stop browsers and picky clients from complaining about the lack of HTTPS, it's also quite easy to throw in some TLS termination:
/data/tailscale --socket=/tmp/tailscale/tailscaled.sock \ serve https:443 / http://127.0.0.1:80
The Tailscale daemon will fetch a TLS cert from Let's Encrypt, terminate TLS on the robot, and reverse-proxy to Valetudo on localhost:80. I haven't bothered doing this yet, because I'm happy with just HTTP, but it's nice to know that the option is there if I want it later.
But Tailscale is a cloud!!!
At this point I suspect some readers are thinking that I've just replaced one cloud connection with another. I liberated my robot, but then I reattached it to Tailscale's control plane.
And yes, that's true to some degree, but there are significant differences. Tailscale acts as a coordinator to help your own devices talk to each other directly, but all the communication happens over peer-to-peer WireGuard tunnels that Tailscale-the-company can't see into. The client's source code is open source, so you can verify that yourself.
Tailscale's control plane is not load-bearing for connectivity. If Tailscale's servers go down, your vacuum will keep working just fine, as will connectivity to the vacuum. So, for example, your home automation system won't lose access to the robot if this happens.
Even though Tailscale-the-company doesn't want to see your data, the cloud control plane is a point of attack that could inject new devices into your tailnet. This would be highly visible and not a very sneaky attack method, but if you're worried about that, you can use tailnet lock to remove Tailscale's control plane from the trust envelope: new devices cannot join your network without a countersignature from an existing device, using a PKI that is separate from the Tailscale control plane.
Perhaps you don't like that Tailscale only has OAuth sign-in, which requires you to use a Gmail, Microsoft, or GitHub account for auth (we support other providers too, but they're paid services so even less likely to be interesting to enthusiasts). That's fair, and we built custom OIDC support so that you can bring your own auth stack if you prefer.
And if you really cannot stand having a cloud involved in your vacuum robot at all, I understand. Given the track record of the SaaS/cloud industry, it's hard to trust anyone! In that case, Headscale is an open-source implementation of the Tailscale control plane that you can self-host, and cut Tailscale-the-company out of the loop entirely while still getting the benefits of secure connectivity and NAT-busting remote access.
Conclusion
So, what did we learn here? Well, I learned that jailbreaking vacuum cleaners feels great. I learned that Dennis Giese and Sören Beye are amazing people, and I'm grateful that they choose to share their knowledge and expertise with the world. I learned a whole lot about the state of IoT (remember the "S" in "IoT" stands for "security"), and the fascinating world of consumer robotics.
And perhaps most importantly, I learned that if I blog about putting Tailscale on weird unusual devices, I can get Tailscale to reimburse me for the device. And that's a dangerous precedent to set.
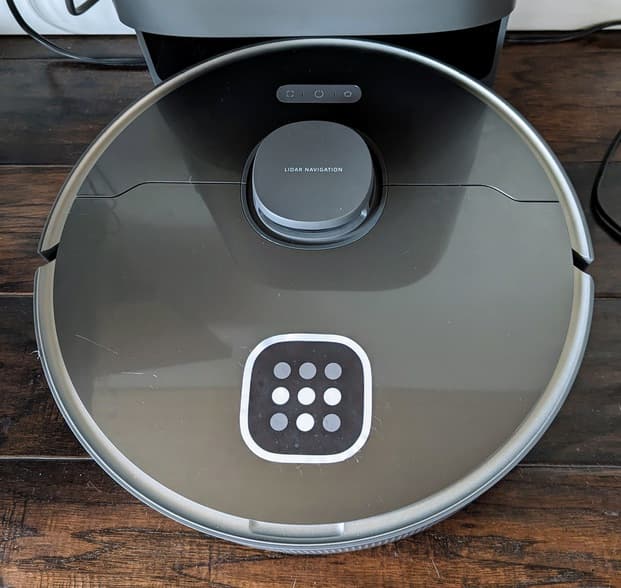
Naturally, the cats have already figured out that the one place the robot can't clean up their hair, is on top of the robot itself. The irony.